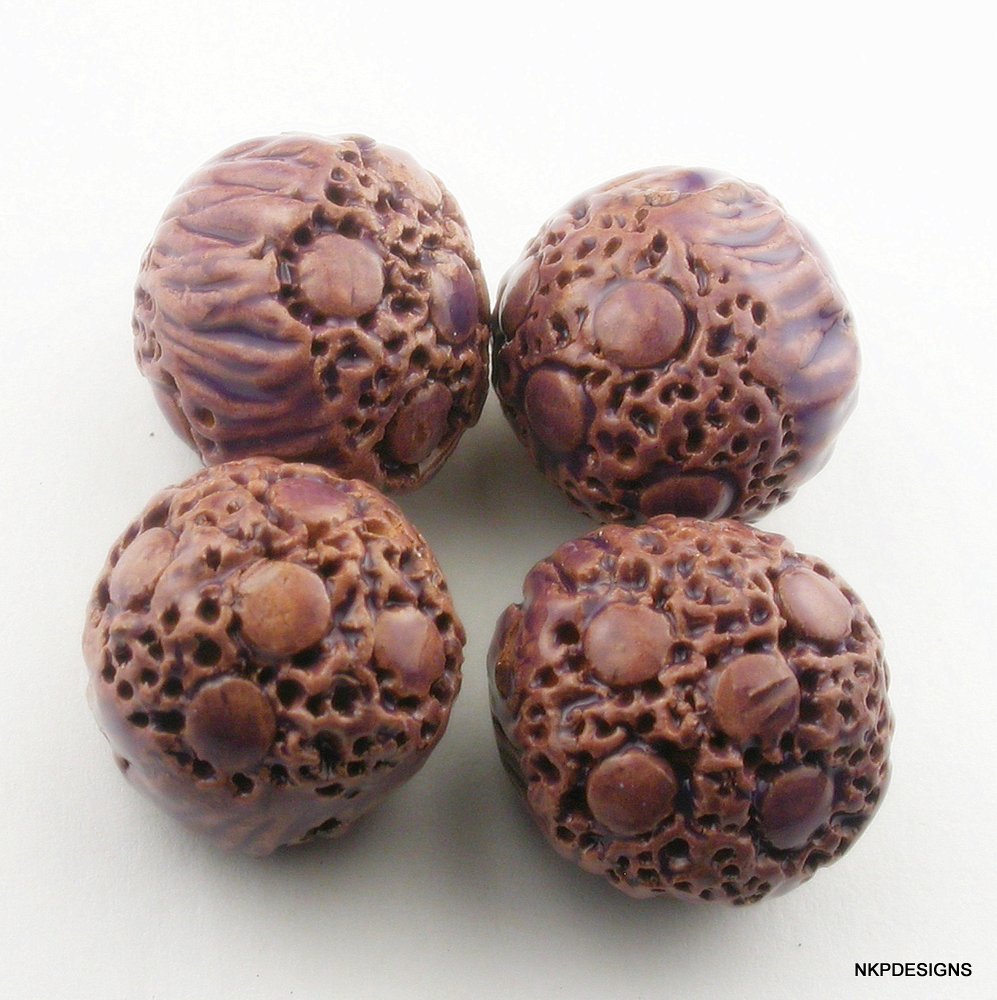
I meant to post these yesterday when they got out of the kiln but I never got a chance.
So here they are ... the beads that were in the kiln from my last blog post.
I got to see my granddaughter briefly yesterday. She's just started her 4th week of life. The last three weeks have flown by. Soon, before I can take a good deep breath, she will be half grown then full grown.
That's how it is with children. Suddenly it seems as though they skipped childhood and went straight to adulthood ... even though there were times when they were little that I thought I'd never have a spare moment all to myself unless I was using the potty (and sometimes not even then), lol.
But I digress ... um, back to the beads ... I did have a lot of fun making them, but I don't foresee myself making more of these unless I go on another trip. Each one takes a lot to make and I have to let my hands rest in-between.
I'll be putting these in my etsy store this week sometime (in-between seeing the grandbaby and all of that yummy grandparent stuff). I'm going to put them in there as sets of 1, 2s, 3s, and so on.
Thanks for stopping by!
NKPdesigns
Sunday, April 29, 2012
Friday, April 27, 2012
Beads Beads Beads
I've been making some pretty beads the last few weeks. I have some in the kiln firing today. But I should back up ... I've been taking short trips. This month I've been as far north as Amarillo and as far south as Galveston. On the way there and back I sat in the passenger seat of the car and made beads. It's a nice way to pass the time.
I brought with me a brown iron-rich stoneware clay. I used only these two 'tools', an aluminum knitting needle and a little do-dad that I grabbed and threw into my texture basket some time ago.
I made lines in the middle of each bead with the knitting needle. I thought the lines would add great texture and the glaze (if I picked the right glaze) might pool nicely in the ridges.
One thing I have to do now that I didn't do a few years ago is wear reading glasses when I create beads. I have lost most of my near sighted vision due to the normal aging process. Without glasses anything a foot or less from my eyes is incredibly blurry.
This most bothers me when I'm eating because I can't see my food! I haven't started wearing reading glasses during dinner yet, but I see that happening in my soon to be future.
(um, getting back to the beads) ... so I took this little do-dad thing, and I don't remember where or what it came from, and I pressed circles in each side, with one in the middle and four on north/south/east/west, for a total of five round circles.
I liked this look. And I almost stopped there, but we were miles and miles away from our destination and there was not much to do so I picked them back up and poked a bunch of holes around the circles with the knitting needle.
Last of all I remembered to put a stringing hole in each bead. About a month ago I sat down for about three hours and created some incredibly detailed beads.
Unfortunately I forgot to add holes to every single one of them. I actually bisque fired them that way. I don't know where my mind was ... it obviously wasn't in the right place. I have them in a bag and I may or may not drill holes in them. I might just paint them with acrylics or something and use them as jacks (you know that game we all played as little girls and sometimes as big girls?).
(um, getting back to the beads) ... so I put these in the kiln when I got home and I did remember to put holes in each one, and they came out yesterday morning. I coated each one with a lovely Wisteria Purple glaze and they are firing today.
I was going to wait until they came out of the kiln tomorrow morning before sharing this blog story, but then I decided that it might be fun for you all to wait with me because I am always waiting to see how they come out and perhaps you would want to share in my anticipation. lol!
Thanks for stopping by!
I brought with me a brown iron-rich stoneware clay. I used only these two 'tools', an aluminum knitting needle and a little do-dad that I grabbed and threw into my texture basket some time ago.
I made lines in the middle of each bead with the knitting needle. I thought the lines would add great texture and the glaze (if I picked the right glaze) might pool nicely in the ridges.
One thing I have to do now that I didn't do a few years ago is wear reading glasses when I create beads. I have lost most of my near sighted vision due to the normal aging process. Without glasses anything a foot or less from my eyes is incredibly blurry.
This most bothers me when I'm eating because I can't see my food! I haven't started wearing reading glasses during dinner yet, but I see that happening in my soon to be future.
(um, getting back to the beads) ... so I took this little do-dad thing, and I don't remember where or what it came from, and I pressed circles in each side, with one in the middle and four on north/south/east/west, for a total of five round circles.
I liked this look. And I almost stopped there, but we were miles and miles away from our destination and there was not much to do so I picked them back up and poked a bunch of holes around the circles with the knitting needle.
Last of all I remembered to put a stringing hole in each bead. About a month ago I sat down for about three hours and created some incredibly detailed beads.
Unfortunately I forgot to add holes to every single one of them. I actually bisque fired them that way. I don't know where my mind was ... it obviously wasn't in the right place. I have them in a bag and I may or may not drill holes in them. I might just paint them with acrylics or something and use them as jacks (you know that game we all played as little girls and sometimes as big girls?).
(um, getting back to the beads) ... so I put these in the kiln when I got home and I did remember to put holes in each one, and they came out yesterday morning. I coated each one with a lovely Wisteria Purple glaze and they are firing today.
I was going to wait until they came out of the kiln tomorrow morning before sharing this blog story, but then I decided that it might be fun for you all to wait with me because I am always waiting to see how they come out and perhaps you would want to share in my anticipation. lol!
Thanks for stopping by!
Sunday, April 01, 2012
And the Winner is ....
A couple of weeks ago I staged a giveaway about one of my whistles and said I would announce the winner on April 1st, NO FOOLING!
...and the winner is Jean A. Wells! Happy April 1st day!
I already have your addy so I'll be putting it in the mail for you tomorrow!
I know you'll have fun with this small object of noise! :)
...and the winner is Jean A. Wells! Happy April 1st day!
I already have your addy so I'll be putting it in the mail for you tomorrow!
I know you'll have fun with this small object of noise! :)
Saturday, March 17, 2012
Metalwork in Clay
I had so much fun today at Lolly's house! She invited me over to have more fun with metal and settled me in at this wonderful desk her hubby made for us (seriously, he made it for us -- he's awesome!), one side for her and one side for me. It is my studio away from home. It is wonderful!
We took out our tools. We started at 10 and took an hour for lunch and I left at 5:30. Time flew! I can only hope I didn't overstay my welcome.
I am trying to learn now to solder and I'm not having a lot of luck with the torch so I used an soldering iron and copper tape instead. It was fun.
This one has just a tiny bit of copper tape, which I cut into an oval and draped over both sides of the pendant. Yes, I had to use a dab of e6000 glue. It is a good solid hold though.
I fired these particular pendants a week or so ago. They are of an ivory stoneware clay and a dark red stoneware clay. I coated them with a pale pink glaze. I like this effect of this particular glaze with these two types of clay. And of course, I love decorating using sprigs of clay.
This is a pendant I wrapped all the way around with copper tape and then applied lead free (of course) silver solder. I attached a jump ring to the back for a bale. The great thing about this pendant bead is that the back is not covered so my potter's mark is visible.
I am thinking I may add some Swarovski Crystals to the little dimples in this bead.
Here's another in the same style.
A long long time ago I bought a few tiny mirrors and scrapbook odds and ends. So I made this.
I tried to solder two halves of copper domes together numerous times. Here they are. This is called pure determination. I used a clear flux and painted it on each dome. I held them together with tweezers and attached a glob of silver solder on both sides to hold the two domes together.
Then I realized since the entire copper dome was covered with flux that I could simply 'paint' the silver solder on with the top of the soldering iron. So I did. When I was done I pickled them and used my Dremel to shine them up.
When I got home Joy was thrilled to see me.
Mister was extremely glad to see me too, because that meant the grill would be started, and the grill always means good smells and a bite or two of whatever is cooked that night.
So that was my very fun day! Thanks for stopping by!
We took out our tools. We started at 10 and took an hour for lunch and I left at 5:30. Time flew! I can only hope I didn't overstay my welcome.
I am trying to learn now to solder and I'm not having a lot of luck with the torch so I used an soldering iron and copper tape instead. It was fun.
This one has just a tiny bit of copper tape, which I cut into an oval and draped over both sides of the pendant. Yes, I had to use a dab of e6000 glue. It is a good solid hold though.
I fired these particular pendants a week or so ago. They are of an ivory stoneware clay and a dark red stoneware clay. I coated them with a pale pink glaze. I like this effect of this particular glaze with these two types of clay. And of course, I love decorating using sprigs of clay.
This is a pendant I wrapped all the way around with copper tape and then applied lead free (of course) silver solder. I attached a jump ring to the back for a bale. The great thing about this pendant bead is that the back is not covered so my potter's mark is visible.
I am thinking I may add some Swarovski Crystals to the little dimples in this bead.
Here's another in the same style.
A long long time ago I bought a few tiny mirrors and scrapbook odds and ends. So I made this.
I tried to solder two halves of copper domes together numerous times. Here they are. This is called pure determination. I used a clear flux and painted it on each dome. I held them together with tweezers and attached a glob of silver solder on both sides to hold the two domes together.
Then I realized since the entire copper dome was covered with flux that I could simply 'paint' the silver solder on with the top of the soldering iron. So I did. When I was done I pickled them and used my Dremel to shine them up.
When I got home Joy was thrilled to see me.
Mister was extremely glad to see me too, because that meant the grill would be started, and the grill always means good smells and a bite or two of whatever is cooked that night.
So that was my very fun day! Thanks for stopping by!
Friday, March 16, 2012
Something Fun to Show You - Micaceous Clay
I had to use Google to see how to spell 'micaceous'. I often wonder what the Google spy/advertising staff thinks of me and my weird inquiries because I often use Google to double check my spelling.
My ceramics instructor this semester brought some micaceous clay to class that she had bought in Albuquerque, NM earlier this year. She gave me some and told me to have fun. So I made this bead. I fired it to cone 06. I applied a clear glaze and refired to cone 05.
Do you see the golden glitter flakes? I want to see what these look like with a transparent blue or green, or even yellow and pink.
Thanks, Jackie! I'll go in halves with you next time you visit New Mexico.
My ceramics instructor this semester brought some micaceous clay to class that she had bought in Albuquerque, NM earlier this year. She gave me some and told me to have fun. So I made this bead. I fired it to cone 06. I applied a clear glaze and refired to cone 05.
Do you see the golden glitter flakes? I want to see what these look like with a transparent blue or green, or even yellow and pink.
Thanks, Jackie! I'll go in halves with you next time you visit New Mexico.
Wednesday, March 14, 2012
Whistle Giveaway!
I mentioned this a few weeks ago and now have a whistle that I absolutely love and so I want someone who also absolutely loves it to have a chance to win it.
As you can see, it is quite small. 1 1/2" from tip to tip.
It has a high pitch because it is small. Click here to hear this whistle. To see how I make these, check out my tutorial.
I am going to run this contest for two weeks and will announce the winner on April 1st. NO FOOLING!
I'll use the random number generator at the sidebar of this page to pick a winner. TO QUALIFY all you have to do is promote my whistle shop in some form or fashion. You can tweet it, favorite it, add me to your etsy circle, facebook like it, blog it, email a link to a friend, you decide. Just leave me a note here letting me know how you promoted it and you will be entered. ***The more you promote and leave a comment the more chances you have to win.
A word about my whistles ... they are very fun to play with. But they also have this built in feature that if you blow really really hard on them they make no noise at all. Of course, a regular size blow is quite loud, but it never gets any louder than that.
Side story: I knew a lady years ago that would take great joy in picking out her gifts for her nephews. I got the feeling she didn't like her sister-in-law because she picked the loudest most obnoxious toys she could find. This whistle only has a small annoyance factor and probably wouldn't work for that kind of a gift.
I'm just saying ...
SO what is the link to my whistle store? http://nkpwhistles.etsy.com
Thanks and have fun!
Tuesday, March 13, 2012
New From the Kiln
I took these out of the kiln this morning and even have them listed already (http://nkpbeads.etsy.com). Look in the Sprig section if you're reading this a few days after I publish this post.
Yesterday I glazed about 10 whistles and handpainted some stamped beads so that the stamped part was a different color than the rest of the bead. It was very tedious but I was in the mood to do something tedious so it was a perfect way to spend the day. And it did take all day. I'm a slow glazer. They are all in the kiln today and I have just turned them on high. They should finish firing in a couple of hours.
Today I unloaded the kiln and I was happy with these but I have some other beads that I'm disgusted with and I'm going to reglaze them. I've often said beads are like children, that neither can ever be ugly but I'm rethinking that. These beads are very ugly! Ick! That particular blue green glaze comes out shiny on one side and matte on the other and it is a dark glaze and it looks like an acrylic finish instead of a glaze finish. I will reglaze them. They are so ugly I can't even bear to take their photo. You'll just have to believe me. They are ugly.
I spent the better part of the morning watching how to videos from Art Jewelry Magazine on You Tube on how to make a bezel for a cabochon. It was a 5 part series, each one about 4 minutes long. Great series! Now I get to try it on my own. We'll see how THAT goes. ;)
I hope whoever is reading this is having a great day! And thanks for stopping by!
Yesterday I glazed about 10 whistles and handpainted some stamped beads so that the stamped part was a different color than the rest of the bead. It was very tedious but I was in the mood to do something tedious so it was a perfect way to spend the day. And it did take all day. I'm a slow glazer. They are all in the kiln today and I have just turned them on high. They should finish firing in a couple of hours.
Today I unloaded the kiln and I was happy with these but I have some other beads that I'm disgusted with and I'm going to reglaze them. I've often said beads are like children, that neither can ever be ugly but I'm rethinking that. These beads are very ugly! Ick! That particular blue green glaze comes out shiny on one side and matte on the other and it is a dark glaze and it looks like an acrylic finish instead of a glaze finish. I will reglaze them. They are so ugly I can't even bear to take their photo. You'll just have to believe me. They are ugly.
I spent the better part of the morning watching how to videos from Art Jewelry Magazine on You Tube on how to make a bezel for a cabochon. It was a 5 part series, each one about 4 minutes long. Great series! Now I get to try it on my own. We'll see how THAT goes. ;)
I hope whoever is reading this is having a great day! And thanks for stopping by!
Wednesday, March 07, 2012
New Whistles and Studio Progress
These all came out of the kiln this morning. I posted each individual's photo on flickr (click here) . Some have two holes, some have one hole, but most are single tone whistles.
I still have about 20 more to glaze and fire. My next batch will be a bit bigger I think. I don't know. I still may change my mind and make more of these. They are fun to make.
Yesterday I posted a photo of my empty shelves. Today I am showing a picture of the same shelves. I bought 30 clear shoebox size containers and I filled every single one up. I actually have to go buy more!
I still have to clean off the top shelf, but it is a good feeling to have this small part finished. I have a lot of glazes, yes? And I have lots of chemicals to make more glazes. I like glazes. Can you tell?
I have one section of this shelf system full of nothing but bisque beads ready to be glazed. I actually have some more containers to add to this shelf but one can only do so much in one day! I hope to tackle the long wall part of my shelves today. That will require a trip to the store to buy more containers. My goal is to finish this reorganization project by Friday.
I still have about 20 more to glaze and fire. My next batch will be a bit bigger I think. I don't know. I still may change my mind and make more of these. They are fun to make.
Yesterday I posted a photo of my empty shelves. Today I am showing a picture of the same shelves. I bought 30 clear shoebox size containers and I filled every single one up. I actually have to go buy more!
I still have to clean off the top shelf, but it is a good feeling to have this small part finished. I have a lot of glazes, yes? And I have lots of chemicals to make more glazes. I like glazes. Can you tell?
I have one section of this shelf system full of nothing but bisque beads ready to be glazed. I actually have some more containers to add to this shelf but one can only do so much in one day! I hope to tackle the long wall part of my shelves today. That will require a trip to the store to buy more containers. My goal is to finish this reorganization project by Friday.
Tuesday, March 06, 2012
Dashing Along
I'm just dashing up a quick blog post to let everyone know what I've been doing. I've been trying to organize my studio.
If I wasn't so vain, I would post my before pictures. Just trust me. It's awful in there.
Here is what the shelving looked like when I first built them a few years ago. Imagine them now, stuffed full of everything fun, fun but unorganized fun. It is the type of fun that falls over if not handled correctly and trust me, that's no fun at all!
I have this great space and I have let it get way too cluttered to the point where I have to bring my projects out to the other room just to get anything done. Enough!
A couple of weeks ago, when I went enameling at my friend's house, I fell in love with her studio. It is camera ready, and by that I mean a television studio could walk in and film her and they wouldn't have to straighten anything up to get a good shot. I may never have a 'camera ready' studio, but I could definitely organize things into a great fun space to work that is also a bit decorative, that I actually have space in which to move around.
In the meantime, I do have a small kiln load of 18 whistles firing today outside. I have two trimmed mugs with handles attached drying. I will take them to the college on Saturday to be bisque fired. I have beads set out to start taking pictures tomorrow. I have metal forming tools burning a hole in my studio dying to be used. First things first though ....
Thanks for stopping by!
If I wasn't so vain, I would post my before pictures. Just trust me. It's awful in there.
Here is what the shelving looked like when I first built them a few years ago. Imagine them now, stuffed full of everything fun, fun but unorganized fun. It is the type of fun that falls over if not handled correctly and trust me, that's no fun at all!
I have this great space and I have let it get way too cluttered to the point where I have to bring my projects out to the other room just to get anything done. Enough!
A couple of weeks ago, when I went enameling at my friend's house, I fell in love with her studio. It is camera ready, and by that I mean a television studio could walk in and film her and they wouldn't have to straighten anything up to get a good shot. I may never have a 'camera ready' studio, but I could definitely organize things into a great fun space to work that is also a bit decorative, that I actually have space in which to move around.
In the meantime, I do have a small kiln load of 18 whistles firing today outside. I have two trimmed mugs with handles attached drying. I will take them to the college on Saturday to be bisque fired. I have beads set out to start taking pictures tomorrow. I have metal forming tools burning a hole in my studio dying to be used. First things first though ....
Thanks for stopping by!
Wednesday, February 29, 2012
More Porcelain Cups and Mugs
Yesterday I blogged about my latest teacup. I thought I would share some of the others I threw on the wheel that day.
I have 4 more taller mugs/tumblers that I will be trimming and attaching handles to today. I tend to have a higher output if I throw one day and trim and decorate the next. When I shove it all into the same day I end up getting hurried and thinking I have to finish. Then I end up ruining something that could have ended up quite pretty.
I will be throwing small teapot bodies today. Tomorrow I will try putting spouts, handles, and lids on them. If I am successful, I will share some pics. If not, I'll reconstitute the clay for another day.
Thanks for stopping by!
I have 4 more taller mugs/tumblers that I will be trimming and attaching handles to today. I tend to have a higher output if I throw one day and trim and decorate the next. When I shove it all into the same day I end up getting hurried and thinking I have to finish. Then I end up ruining something that could have ended up quite pretty.
I will be throwing small teapot bodies today. Tomorrow I will try putting spouts, handles, and lids on them. If I am successful, I will share some pics. If not, I'll reconstitute the clay for another day.
Thanks for stopping by!
Tuesday, February 28, 2012
Porcelain Cups and Mugs
Yesterday I sat down and threw shapes for mugs and cups. I ended up with a few of each by the time all the trimming and handles were applied.
I decided to play with the outside of this cup a bit, punching it with a homemade oval stamp and a few sprigs as well.
I have a lot of porcelain that I want to use up, and the fastest way to do that is to get on my pottery wheel and throw throw throw.
So that is what I'm trying to do this week, concentrate on getting a few things thrown.
I decided to play with the outside of this cup a bit, punching it with a homemade oval stamp and a few sprigs as well.
I have a lot of porcelain that I want to use up, and the fastest way to do that is to get on my pottery wheel and throw throw throw.
So that is what I'm trying to do this week, concentrate on getting a few things thrown.
Monday, February 27, 2012
Enameling We Will Go ...
I threw out a tease on my NKPDESIGNS Facebook Fanpage Saturday about how I had spent all day learning how to enamel in my friend's garage. I had promised some pictures and so here they are.
My friend had recently been bitten by the enameling bug and when she offered to show me how to do it, of course I jumped at the chance.
I should have taken some pictures of the beginning of the process, but I forgot my camera (much the same way I forget which part of the house I leave my coffee cup sitting).
The process starts with cutting a piece of copper into a shape. Next I filed the edges. I thought that would be tedious and awful, but it wasn't.
After the edges were smooth, I used a hammer and dapped on each piece a bit to raise the edges into a small curl and drilled a hole.
My friend had this cute little machine that screwed down into the copper and cut a clean hole that didn't need filing. The next step was to put it into a pickling solution to clean it. Then we applied the enamel with a nifty little sifter and turned on the flame. She had trivets and we were able to enamel both sides of each piece.
Remember when we were kids and we would put glue on a piece of paper and then cover the paper with glitter, and then we would shake off the glitter and the glitter would stick to all the places the glue had been applied?
Yeah, that's what we did here except we did it with a stamp and special stamping solution. I forget what it is called (scratching my head).
We also applied a transparent green into the corner and fired it. All the firing was done with a simple torch with MAPP gas. My favorite enamel was a simple transparent clear and that's how I did most of the pieces. This was such a fun afternoon. It was like taking a workshop. I got there about 10:30 am and left around 5:30 pm. Yesterday I spent the day shopping on the internet for all sorts of dapping and riveting tools. I've been wanting to play around with cold connections for a while and this enameling process is the perfect stepping stone to doing that.
My friend had recently been bitten by the enameling bug and when she offered to show me how to do it, of course I jumped at the chance.
I should have taken some pictures of the beginning of the process, but I forgot my camera (much the same way I forget which part of the house I leave my coffee cup sitting).
The process starts with cutting a piece of copper into a shape. Next I filed the edges. I thought that would be tedious and awful, but it wasn't.
After the edges were smooth, I used a hammer and dapped on each piece a bit to raise the edges into a small curl and drilled a hole.
My friend had this cute little machine that screwed down into the copper and cut a clean hole that didn't need filing. The next step was to put it into a pickling solution to clean it. Then we applied the enamel with a nifty little sifter and turned on the flame. She had trivets and we were able to enamel both sides of each piece.
Remember when we were kids and we would put glue on a piece of paper and then cover the paper with glitter, and then we would shake off the glitter and the glitter would stick to all the places the glue had been applied?
We also applied a transparent green into the corner and fired it. All the firing was done with a simple torch with MAPP gas. My favorite enamel was a simple transparent clear and that's how I did most of the pieces. This was such a fun afternoon. It was like taking a workshop. I got there about 10:30 am and left around 5:30 pm. Yesterday I spent the day shopping on the internet for all sorts of dapping and riveting tools. I've been wanting to play around with cold connections for a while and this enameling process is the perfect stepping stone to doing that.
Thursday, February 23, 2012
Marbled Whistles
I made these last night and am waiting for them to dry enough to bisque fire them.
If you haven't checked out my whistle shop on Etsy, have a look: click here
I'm adding one whistle a day and each listing includes a link to listen to each whistle's individual sound.
My daughter is nearing the end of her pregnancy and soon I am going to be a grandma. I am more excited about this than I can put into words.
My daughter is having a little girl and that means eventually she will want jewelry, lots and lots of jewelry, and pretty things. Of course she will have her pick of whistles.
I can't wait for her to get old enough to want to make pretty things, too.
If you haven't checked out my whistle shop on Etsy, have a look: click here
I'm adding one whistle a day and each listing includes a link to listen to each whistle's individual sound.
My daughter is nearing the end of her pregnancy and soon I am going to be a grandma. I am more excited about this than I can put into words.
My daughter is having a little girl and that means eventually she will want jewelry, lots and lots of jewelry, and pretty things. Of course she will have her pick of whistles.
I can't wait for her to get old enough to want to make pretty things, too.
Monday, February 13, 2012
Windshied Car Glass Imbedded in Porcelain
This is a sample of the latest batch! I have more to still fire. I think I may have glazed the next batch with a pale pink. Yes, I will be making more of these. The experiment I did with the longest bead worked like I thought it would; the glass dripped downward and formed a small drop.
These were fired at about 1885 F degrees and the windshield glass still retained its wonderful pale green color.
Friday, February 10, 2012
Second Trumpet Whistle
This is one of the ideas I had about how to make the extension finger holes more ergonomic.
I bisque fired some of the whistles I made earlier this week last night. The little Trumpet Whistle in the last post made it in there. I am going to try to glaze enough for a firing this weekend.
Clay is very drying and I had no idea that making so many whistles would suck all the moisture out of my lips. When I make beads, I use lots of lotion on my hands, but I think I will have to stock up on some chap-stick next time I decide to make these fun musical toys.
I bisque fired some of the whistles I made earlier this week last night. The little Trumpet Whistle in the last post made it in there. I am going to try to glaze enough for a firing this weekend.
Clay is very drying and I had no idea that making so many whistles would suck all the moisture out of my lips. When I make beads, I use lots of lotion on my hands, but I think I will have to stock up on some chap-stick next time I decide to make these fun musical toys.
Subscribe to:
Posts (Atom)

